
Personally, one of the great joys and challenges of model making is to make something that is not only an accurate scale model, but also looks like the real thing. This is, I suppose, the crossover between the science and art of modelling. I have to admit with struggling a little on the artistic side, being a ‘paint by numbers’ sort of artist at best.
Anyway, the mine tub photos attracted some positive comment, so I thought a ‘how to’ blog post wouldn’t go amiss. Since they are now in the Emporium anyone can have a go.
The ‘kit’ has very few parts, and these are dictated by the printing process as much as anything. The first task is to fit the bearing parts to the frame as shown in the picture. Parts are a tight push fit, and as can be seen, I should really have given them a gentle sand back for a neater job. The holes in the frame are then opened up (I used 0.5mm) and 0.3mm wire axle retaining staples added. With 0.6mm axles in place to get the clearances right, I then CA glued everything in place.
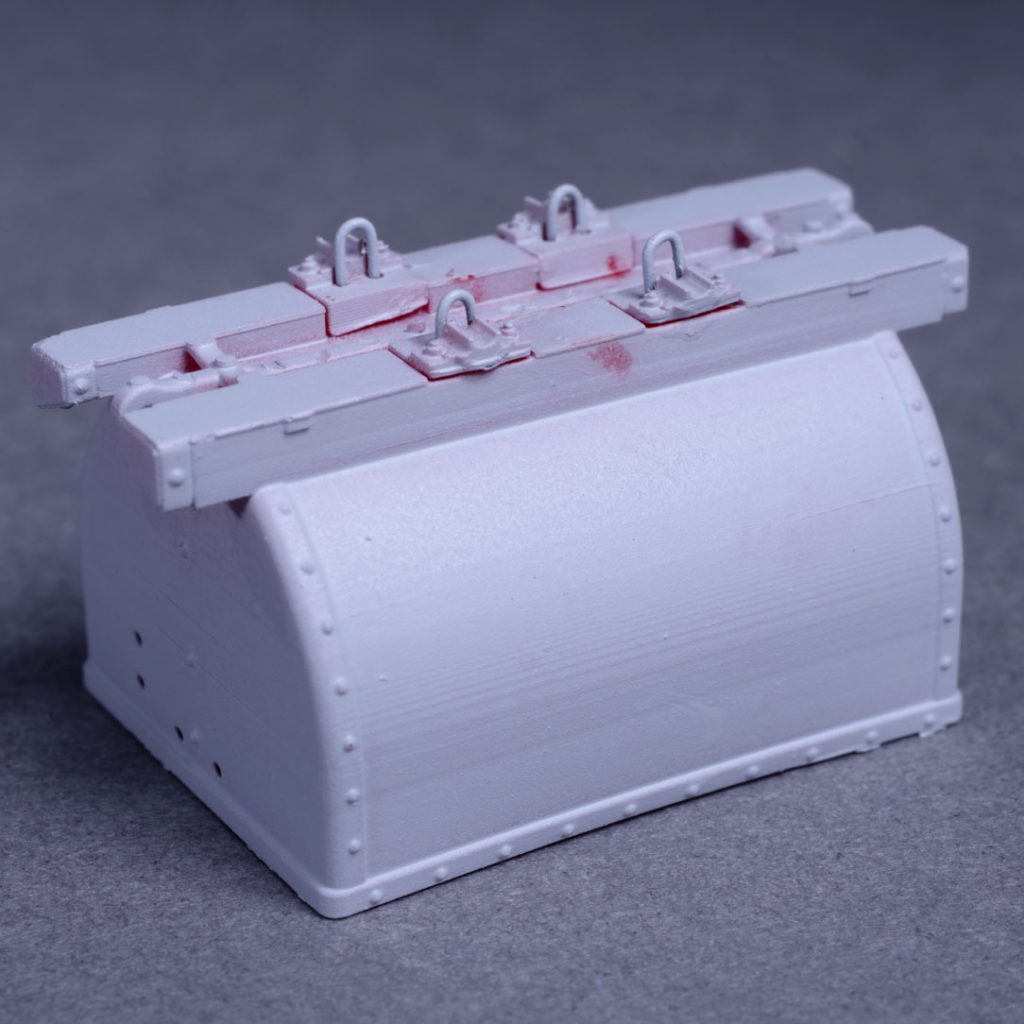
The whole thing was then given a coat of Vallejo surface primer applied by air brush (I used ‘ghost grey’, but ‘rotbraun’/red oxide may have been a better choice). I did the wheels at the same time, having first drilled them out 0.6mm and threaded them onto a piece of wire to make them easy to handle. Experience strongly advocates giving the primer a few days to harden up. I’m seldom patient enough to do that – but it does trip me up from time to time.
One interesting thing about the acrylic resin the parts are made of is that it absorbs water and can go quite soft as a result. This is more of an issue with new prints, as once properly cured the plastic is more rigid. But, if this should happen to you: 1. Don’t panic!; 2. As the model dries out it usually regains it’s original shape; 3. Gentle heat from a hairdryer (or hot water) will allow you to mould the model if required. The new shape sets on cooling. This last point is very useful for straightening fine parts that not infrequently develop slight curvature if curing is not perfectly even. The top hoop of this model alarmingly went almost circular. My fault for a. not curing it; b. being a bit generous with the primer and letting it get wet. The following morning it was more or less back to normal and a hairdrier treatment restored it admirably.
I next sprayed the model with a rust colour (Vallejo 71080 Model Air ‘rust’ acrylic). This will be the top coat for the wheels, but is a basecoat for the tub. Again this should be left for a day or so to harden. This step could possibly be improved by varying the rust shade a bit
Next up I tried salt mask weathering for the first time. Best to Google this and watch some YouTube tutorials. What I did was to gently wet the model in areas where I wanted the galvanised surface to show rust spots. I then sprinkled on table salt, that stuck to the model as shown below. The salt actually sticks quite well, though it doesn’t look it here.

Once the salt addition has dried the model can be painted with a colour to represent the zinc galvanised plate of the tub body. This is an interesting colour varing between a flat light grey through to a more obviously metallic appearance. I sprayed Vallejo Model Colour 70.990 ‘light grey’. This is done cautiously at low pressure to avoid dislodging the salt. This coat is also allowed to dry thoroughly. Once dry, the salt has removed with a stiff brush. This allows the underlying rust to show through in quite a convincing way. This was my first attempt and I’m moderately happy with it. Some of the expert results on the web are much better and I will be practicing to improve this bit.
I finished the sheetmetal by:
- Gently applying Uschi van der Rosten iron-type metal polishing powder (4010). Graphite or pencil lead would probably work just fine too. This highlights the rivets and provides a metallic sheen to the metal work. This is important as the galvanised metal was not a uniform flat grey. While I was at it I did the same for the tire treads. In service these were bright, and I haven’t really gone far enough with this.
- Vertically dry brushing with rust colour.
- Enhancing the colour in the seams with thinned paint and using Faber-Castell PITT artist pens.
- Painting in the strapping in rust colours as photos suggest this was not galvanised and was consistently rusty.
- For really heavy rust working in some talc in the rust coloured paint is useful. However these are supposed to be working tubs, not forgotten relics so I avoided this. The wheel spokes may have benefitted from it though.
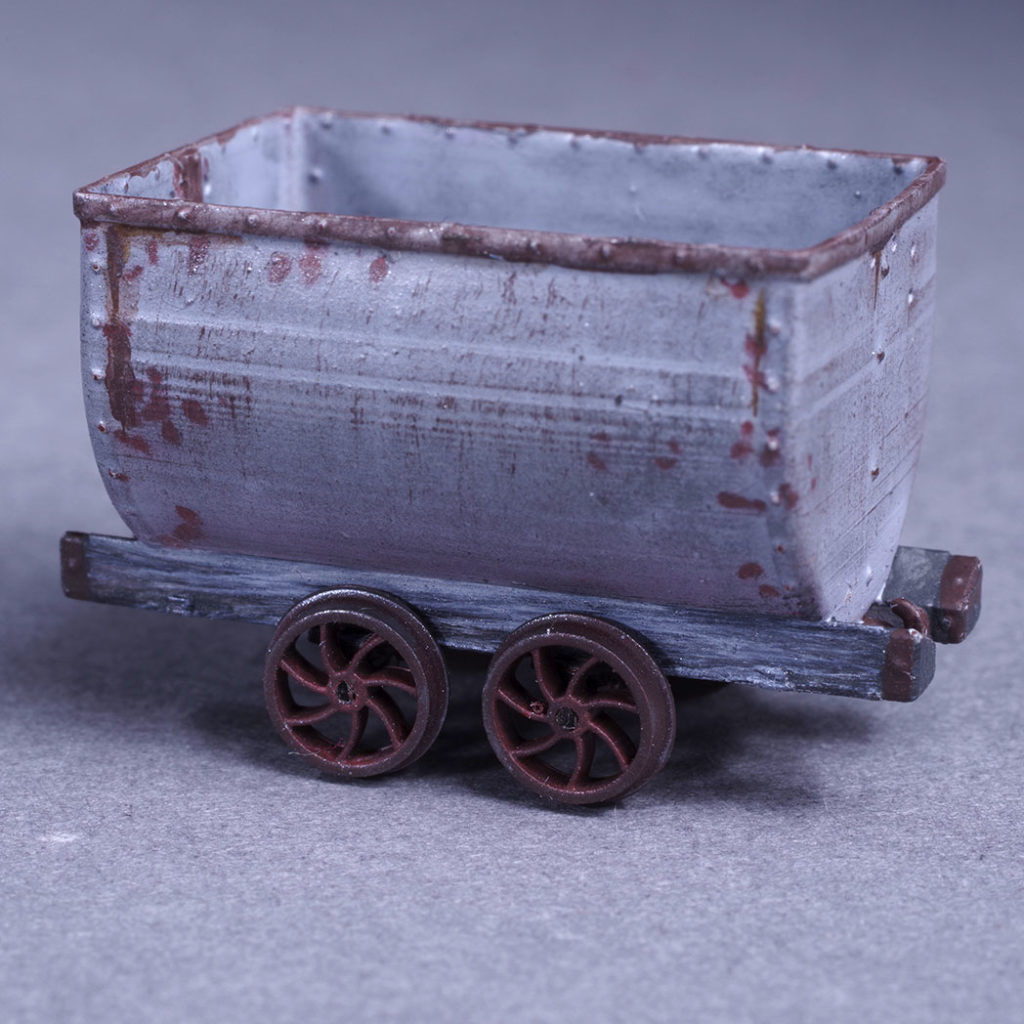
For the wooden frame I used a variation of a technique I gleaned from Peter Ross for sleepers. The frame has no texture – this is all done with paint. Weathered ironbark is actually pale grey, so that is the target here – but it needs to look very different to the galv body to be effective. The frame was first brush painted with a dark grey (Vallejo Model Air 71.055 ‘black grey’). This was was applied quite lightly to that coverage was a bit uneven with the lighter grey of the body colour showing through a bit in places. Next the frame was drybrushed with black. I used slightly more paint that one might typically use for a true ‘dry brush’ as the idea is to get streaks of black onto the flat surface. A reasonably stiff, flat brush works well here. This is then repeated using white. I didn’t allow any real drying time between steps for this bit. The initial dark grey was dryish, but otherwise I just cracked on, so the shades mixed in situ.
The last painting task was to touch up the banding on the buffers, drawgear and the bearings in rust colour. I should have also done the ends of the cross bracing but I overlooked that!
Axles from 0.6mm wire were blackened using Birchwood Casey gun blue. There are other products available now, but my trusty old bottle continues to serve. The axles were threaded through the bearings and the wheels added. I made the axles too long, so they were snipped off and the cut end reblackened.
In summary, a fun little project. The painting is the main task and not hard to do. I stumbled along with the one tub as I was feeling my way a bit. Doing a batch of 3 or 6 wouldn’t take much longer than one, and if it all goes wrong there is not much time wasted in starting again.