
Here on the blog, I’ve pontificated on all manner of matters relating to Rewanui (real and model), but it has been a while since the line’s raison d’être has featured. The extraction, movement to the bins and loading of the coal is outside the scope of the model (taking place ‘off scene’ as it were), but the transport of the stuff is what the line is all about. If you just tuned in, all the models are 1:64.
When I first blundered into model railways, a train had an engine at the front, various vehicles behind and a van for the guard at the back. Provided those criteria were met things looked pretty good to me. Many model railways have no more complicated traffic rules than that. But, after some time, it began to dawn on me that engine choice and vehicle consist were not random, but a result of operational constraints and the business of shipping goods and people from A to B. At Rewanui engines were restricted to those with cutaway cowcatchers to clear the centre rail and centre rail brakes. There were rules concerning their operation and timetables for the loco and it’s crew to productively fill their working day. Those timetables took account of typical train weights and load availability, and had contingencies for unusual demand. Locomotives, crews and their trains may be a future topic, but in this post I want to focus on the vehicles behind the engine.
Coal was shipped from the State mine bins at Rewanui in hopper wagons (class Q) and a range of open wagons (Class L and La). Coal in opens was destined for local delivery or transport on the rail network, whereas that loaded into the hoppers was destined for transfer to ships at the Greymouth wharf. Q hoppers were unique to the West Coast and will contribute greatly to the character of the model. So in this post I’ll discuss the real thing and my journey in modelling them.
Qs were built to a variety of blueprints and varied over time. NZR practice was to classify wagon models with a number for the ease of operating staff, and these numbers are also typically used by the modelling fraternity, rather than the blueprint numbers. In the case of coal hoppers the NZR recognised 11 variants, referred to as Q1 through to Q11. As a younger and more impulsive modeller this variety filled me with excitement as a varied train was a good train in my book. I rushed into producing kits (a Q5 in pewter, and two far more sophisticated Q2/3 kits in etched brass). I was very pleased with myself for a short while, but then I realised that wagon distribution was not random. Sadly for me Q2 and Q3 were Westport variants, which did not fit the Rewanui or earlier Brunner layouts at all. After the rail link through the Buller gorge was opened in 1942, they could very occasionally be seen at Greymouth if the Buller bar was closed, but would not venture up the Rewanui incline. Moot in my 1940 setting in any case. Disappointing, but it did prompt a more considered choice of future modelling projects and a consideration of how the railway actually worked.
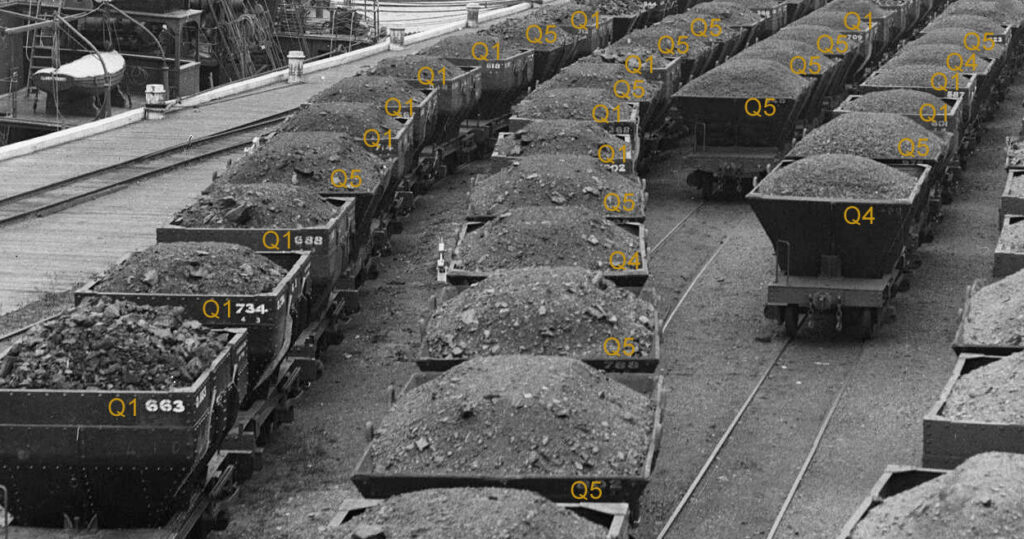
In this crop of a 1920s image of Greymouth wharf the distribution of Q hopper types is evident. Wagons on a Greymouth wharf. The Press (Newspaper) :Negatives. Ref: 1/2-041082-G. Alexander Turnbull Library, Wellington, New Zealand. /records/22311556
It should be understood that, while the hoppers were removable for loading the colliers, hoppers and underframes were matched pairs that did not get swapped around in traffic (though this could happen in the shops and there were one or two less common pairings of hopper and underframe as a result). For safe and convenient working on the inclines the handbrake was always at the uphill end of the wagon. Likewise on the wharf the door mechanism was to the landward side. Wagon painting (number and tare weight) was asymmetric, presumably to make reading details easier at the weighbridge and elsewhere. All perfectly sensible, but the arrangement of the incline at Denniston and the wharf at Westport were different, and the wagon fleets reflected this. There were also some minor hopper alterations to some Westport hoppers to better retain the load due to the steepness of the Denniston incline. As a result, even when a route through the Buller Gorge made interchange possible, this did not happen.
So this all has implications for the trains at Rewanui. Obviously only Greymouth fleet wagons can feature and the orientation of both underframe and hopper will be fixed. Consists are unlikely to have Qs sprinkled through the train. More likely trains will be all Qs or have a block of Qs together as they will all be heading to the wharf, and staff will not want to unnecessarily shunt them on the way. Modelling time spent on door latches and brake gear will be largely unappreciated by the viewer as it should face the other way.
The Greymouth fleet in 1940 consisted primarily of wagons built (or rebuilt) in the period 1908-1914, which is about the time the Rewanui branch opened. Wagon details drawn from records on the NZ rolling stock database site, Cedric Green diagram sheets and NZR record sheets supplied by Kevin Crosado suggest the following distribution of Q wagons in Greymouth for the 1940 period. Note that there are some minor discrepancies in sources and that some wagons were written off (and in some cases returned to service) prior to 1940.
Q1. (around 212 wagons allocated to Greymouth). These were iron hopper wagons of 8.5t (originally 8t) capacity rebuilt around 1908 from earlier 6t capacity fixed hopper wagons built prior to 1890. The sides were raised to achieve the extra capacity and as a result the lifting eyes originally at the top edge of the hopper were recessed into pockets on rebuild. The rebuilt hopper was to BP3270 running with BP348 underframes.
Q4. (around 60 wagons allocated to Greymouth). These wagons with flat sided iron hoppers to BP3146 and underframes to BP3148 appear to be the standard design for the first decade or so of the twentieth century. Of the Greymouth 60, 15 or so of these hoppers were fitted to earlier BP348 underframes (presumably to replace damaged hoppers) but were nevertheless classified Q4.
Q5. (around 200 wagons allocated to Greymouth). The Q5 was a step change in design moving to wood for both hopper and underframe (BP4345). Presumably this was for reasons of economy or material availability. Q5s overlapped Q4 production from 1908-1914.
Q7. (around 19 wagons allocated to Greymouth). A small class of wagons from the mid 1930s consisting of replacement wooden hoppers (to BP 25284) to fit Q4 underframes. Wagons retained their original number.
In total then, just under 500 Qs formed the Greymouth fleet. Q2, 3, 6, and 8 appear to be exclusively Westport variants. Q9, 10 and 11 appeared after 1940 and were all air braked. So for the purposes of my current modelling all of these variants can be ignored.
As a general principle in achieving modelling realism it pays to model the typical and mundane rather than the unique or unusual, tempting as the latter may be. Following that principle the layout needs quite a lot of Q1 and Q5 in roughly equal numbers. Q4 numbers should be around a third of Q1 or Q5 and a few Q4s with BP348 underframes and Q7s could be justified. A ratio of 12 (Q1) : 12 (Q5) : 3 (Q4 w/BP3148) : 1 (Q4 w/BP348) : 1 (Q7) would represent the prototype reasonably accurately. The prototype image of Greymouth wharf supports this pretty closely (although it predates Q7 construction).
The models
Very early on in this journey I embarked on designing my first wagon kit. The Q5 in pewter. This was done as a kind of subscription thing where a group of five of us undertook to take 10 each to cover costs. Of course patterns for this were from brass by hand. The result is shown below and was quite successful for a pewter kit.
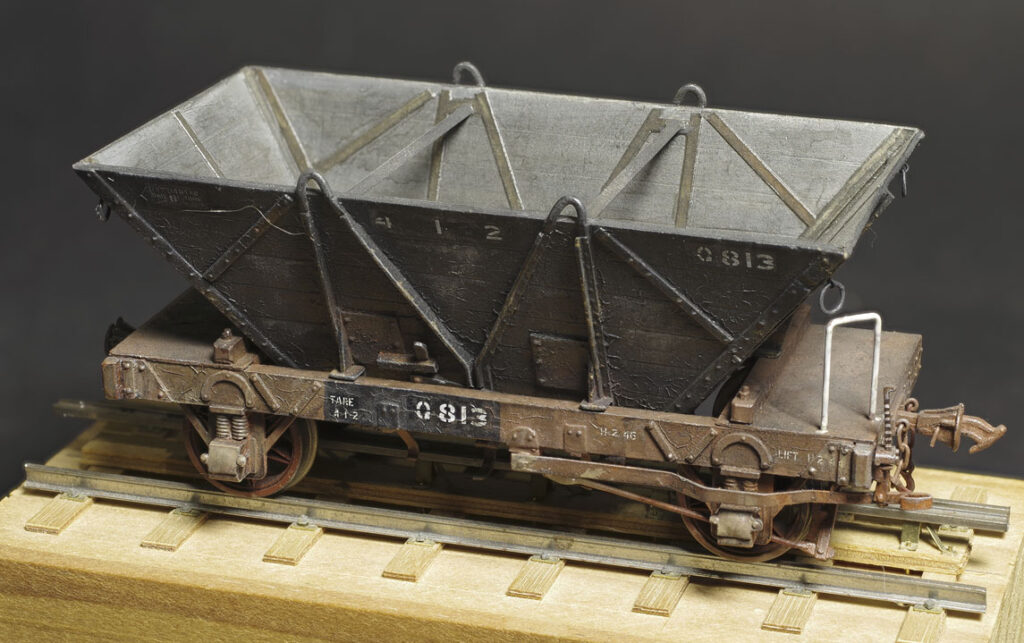
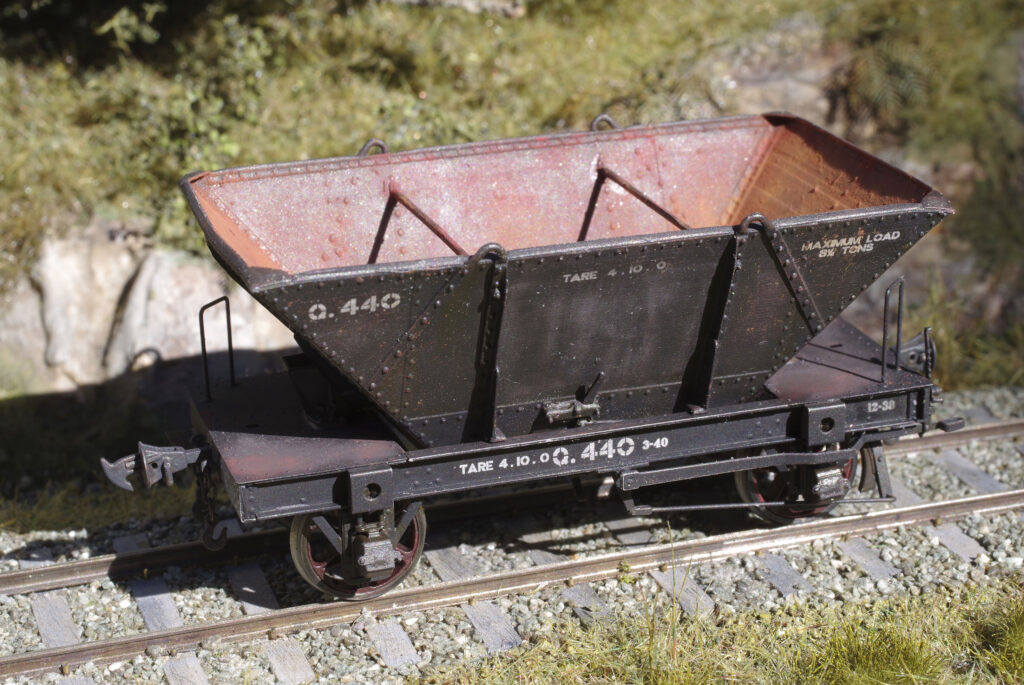
Around 30 years on it has deficiencies that I’m no longer really happy with. These are more to do with my current aspirations and standards than inherent problems with the kit. Firstly the kit represents the Q5 in later years with steel platforms and door springs. There is no internal detail to the hopper, and it is hard to add (in this example the internal strapping is paper, etched strapping being very difficult to work with). As I now use scale wheels, compensation or springing is really needed and, while possible, that is a bit tricky to add. As fond as I am of this example, not only is it modelled in later condition than I now need, but I learnt the hard way that painting diagrams cannot always be trusted. The underframe should be black. The crackle paint was an attempt to model the tar the vehicles were coated with.
I next tackled the cul de sac that was the Q2 and Q3. Nothing wrong with the kits, just kits of the wrong wagons for Rewanui.
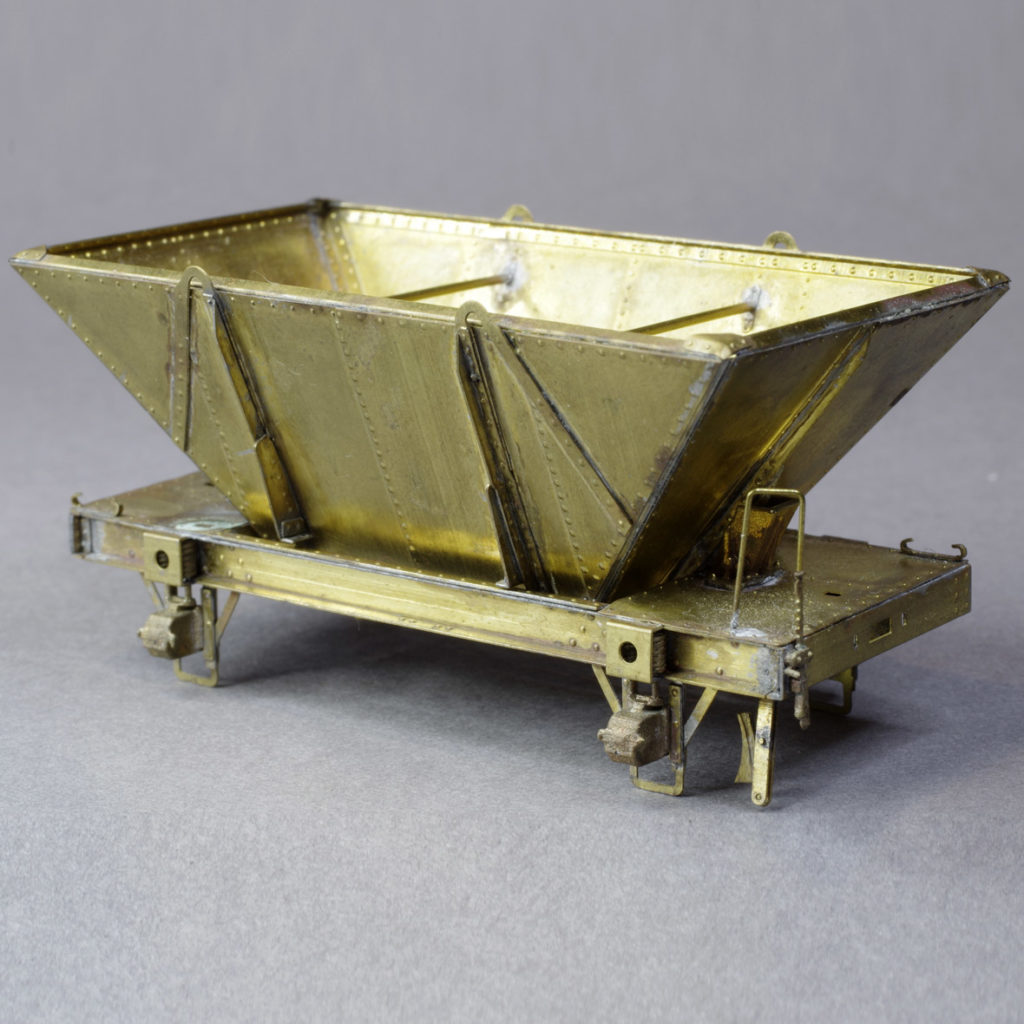
Still, having worked out it was possible to do the curves on the BP 1974 hopper of the Q2/3, I moved on to etch the Q1 and the simpler (I thought) Q4.

The Etched Q1 in the raw. Clever (if I do say so myself), with multiple layers to provide the relief of the plating. A bit lacking in interior rivets, but looks OK. Suspension is engineered in and it’s a reasonable weight. By this stage I was into digital casting patterns so pretty solid all around.
The etched Q4. With this this one I managed all the rivets inside and out.
Was I happy now? Not really. The kits are great, but quite time-consuming to build. Excellent fun and hours of entertainment for the aspiring modeller of the West Coast scene, but when you are contemplating dozens of wagons you need more patience than I have to build a large fleet. I’d really just reached the foot of the mountain and realised how high it was.
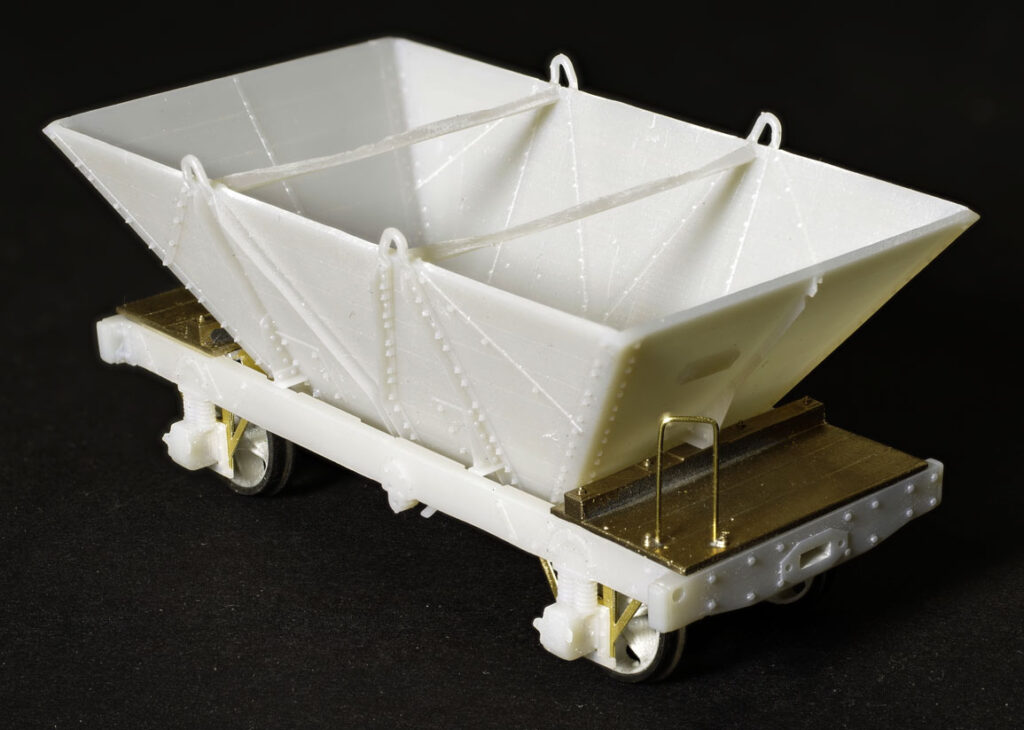
Fortunately technology came to my rescue and the penultimate New Zealand Finescale Q1 and Q4 kits feature a similar etched underframe, but with a one piece 3D printed hopper. A good combination of performance and acceptable build time. Fortunately much of the work that went into the fully etched kits could be reused on the new versions.
Test build for the mixed media Q1 kit.
The mixed media Q4
At this juncture I was well on the way to achieving a well performing hopper fleet that was acceptably accurate for Rewanui in 1940.
A digression on painting…
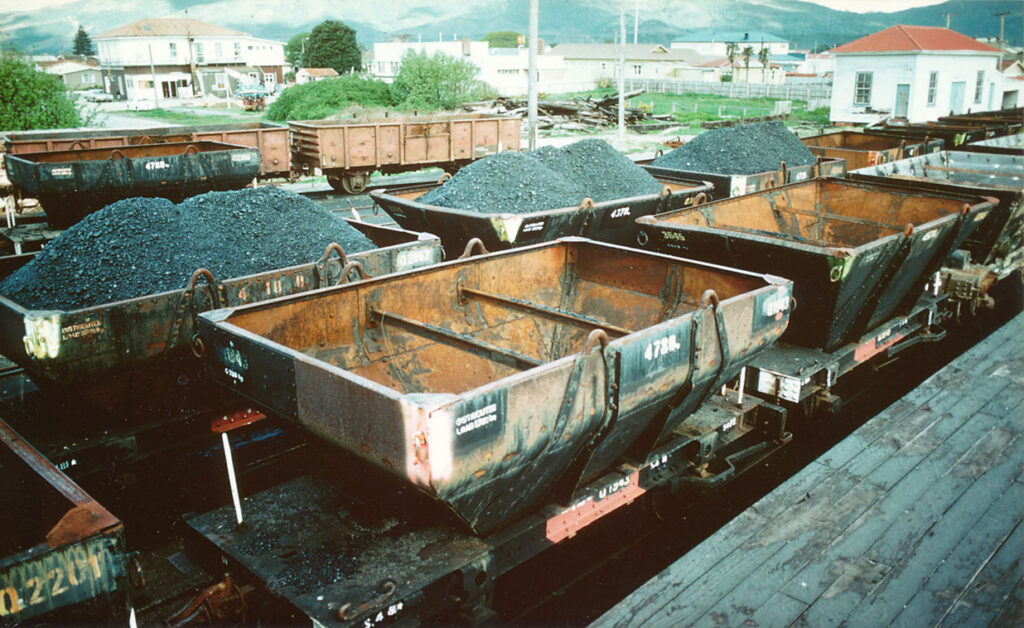
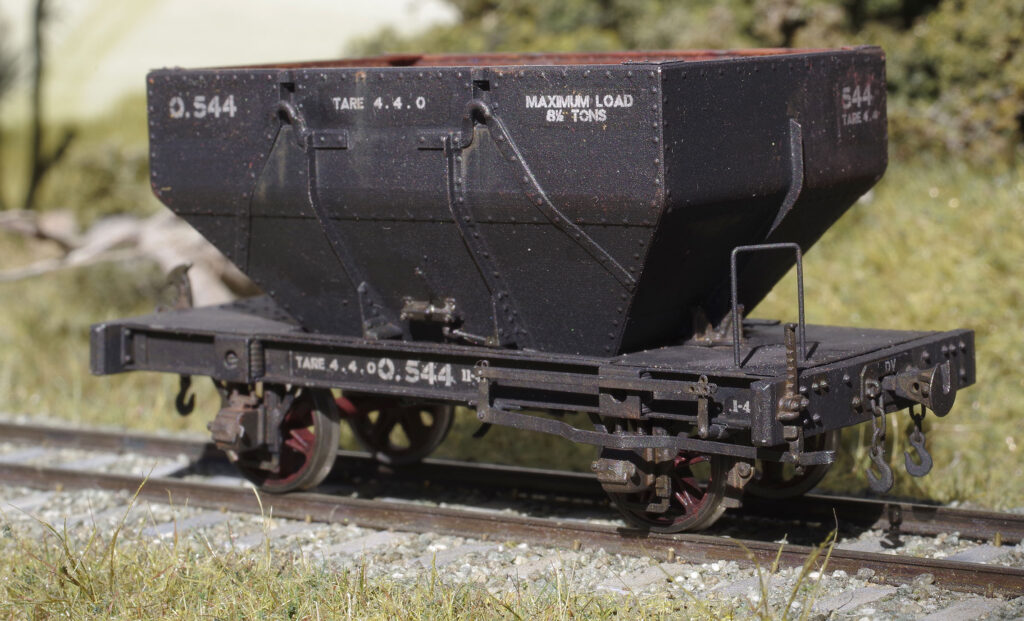
In this 80s Terry Bradley pic taken in Westport the hoppers look very run down, but still clearly in revenue traffic. Note how the residue of tarring within the hopper is pretty minimal and the internal surfaces are mainly orange rust in the iron hoppers or silver weathered wood . It seems likely that even in better times the interiors would not look too much different, even if the exteriors were better kept. Note also that the underframes are painted/tarred black despite contrary instructions in the Painting & Lettering diagram. Q1943 (ex Q146) would have been in service for over 80 years when this pic was snapped.
With Q1 and Q4 sorted, I next started to look for ways to redo the Q5. The hopper is fairly straightforward, being essentially similar to those already done, if different in detail. The underframe was a different story. The iron underframe models gain weight and mechanical performance from the etched underframe. Etching was not going to be ideal to represent a wooden underframe. Casting is problematic on cost, availability and accuracy grounds. 3D prints lack the required mass to work well. So, call me indecisive, in the end I did a mix of all three.
The Q5 kit underframe has a fold up etch subframe that holds the suspension, provides robust W-irons and gives a square and accurate wheelbase. This sits within a 3D printed underframe that has all the cosmetic details. The platforms and internal chassis members are cast from brass, which provides a good low down mass and allows robust hand grab and coupler mounting. The kit will be quick to build and for the most part will not require great care or skill as the normally tricky bits are all done in the design. I’m not hung up on things being quick and easy, but it is a virtue that allows me to get on with the many other tasks on the layout.
The prototype new Q5 kit. Lots to be done here yet as it is a work in progress, but the concept is a success. In this view etch, castings and prints are just clipped together. Fit is superb with minimal clean up and build time is very short. Not a particularly good hopper print and one that has been knocking around for testing, plus the unpainted resin is awful to photograph.
Based on the figures quoted above this leaves me sorted for around 90% of the required hoppers just leaving the oddballs. As the Q7 is a wooden hopper in a Q4 underframe it will be reasonably easy to draw and print the hopper to complete this variant. Likewise, tweaking the fit of the Q4 hopper print to fit the BP348 (Q1) underframe (or swapping castings) for that variant should be OK, though the hoppers are dimensionally different, so exactly how the NZR got them to fit is uncertain. A bit of research will be needed before jumping into that.
So I feel I’ve crossed the pass and begun the descent on my Q hopper journey. There’s still a long way to go, as very few of the wagons are actually built, but most of the challenges have been overcome and I just need to make up a lot of kits.