
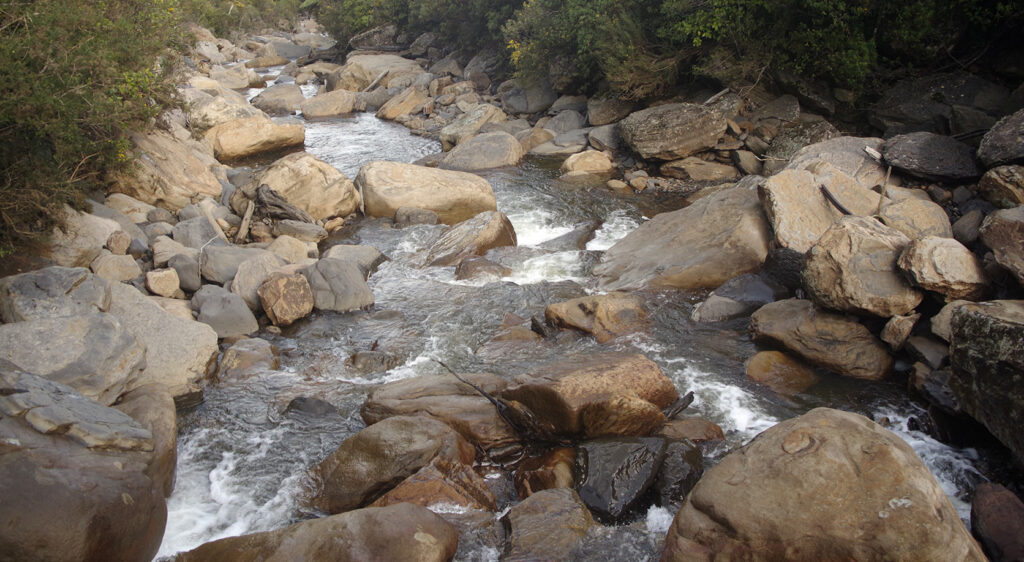
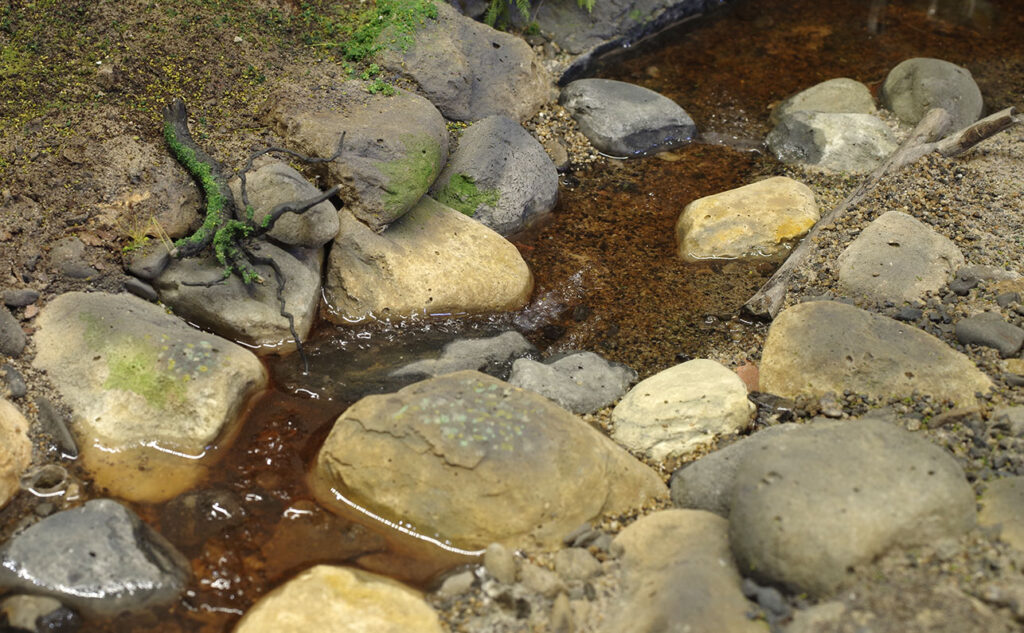
Rewanui, and the mines that shipped coal from the various bins there, was situated in the narrow valley of the Seven Mile Creek. The creek, it’s tributaries, and the bridges that span them are significant features of the prototype and my representation of it. The creeks are not especially large, but they are quite steep in places, and thus there is plenty of white water as the stream folds itself over and around boulders and rocks. I’m aiming for a generally gentle stream, rather than a torrent in flood, similar to the image below. The geology of the area is sedimentary with various sandstones and mudstones represented in the creek bed. In this post I describe how I modelled the Seven Mile Creek in the gorge section of the layout. There’s is nothing entirely original in this, just techniques from many sources cobbled together to suit my circumstances.
Once upon a time bridge 18 spanned this stretch of the Seven Mile. This contemporary view is obviously post 1988 landslip, which has altered the topology a little from my 1940 period. Prior to the landslip this area was somewhat lower and thus the bridge deck was higher above the water than I’ve modelled. When I did the layout topology I lacked earlier photographs, but this doesn’t alter the overall feel much. In any case the model topology of this area has had to be reworked quite a lot to deal with the selective compression in this part of the layout and the distortions to fit the available space. Modelling a deeper gorge would have steepened the sides too much, so overall things have worked out rather well.
On a field trip to the area I collected gravel from the creek and a bag of stones that I felt captured in miniature the appearance of the boulders in the creek. The gravel was screened into various grades to use directly in recreating the creek. The larger rocks were used to make RTV moulds, and facsimiles were cast in Sculptamold for lightness. Multiple copies were cast as, with differing orientation and colouring, duplicates were not going to be obvious.
During baseboard construction the stream bed was laid in on the desired gradient and the rockwork and slopes blended into this. The Sculptamold ‘rocks’ were pre-coloured with dilute washes of various water-based paints to match (roughly) photos of the real things. Using dilute washes of various shades allowed variable colours to be built up which worked quite well. Boulder castings, small stones and sand were then arranged to form the creek bed and fixed in place, as for ballast, with acrylic matt medium. In future I will give more thought to the hydrodynamics than might result, as beaches will form where flow is slow. I didn’t entirely ignore this principle this time around, but it could possibly be better.
Once the bed was finished I over sprayed grey from the airbrush on the rocks that would be above water most of the time. The raw sandstones are quite pale and, where they are submerged or exposed to abrasion, this is the colour they present. However when left exposed they weather and darken to grey. Overspraying grey simulated this well. I also spotted in dots of dilute grey/green and brown acrylic paint to represent the lichens that accumulate on the weathered surfaces. Initially this was a bit over done, so I stippled the lichen spots with a stiff brush moistened with isopropanol. This softened the tone and outline to produce a more effective result. I neglected to photograph the dry stream bed unfortunately, but most of this work is visible in the progress photos.
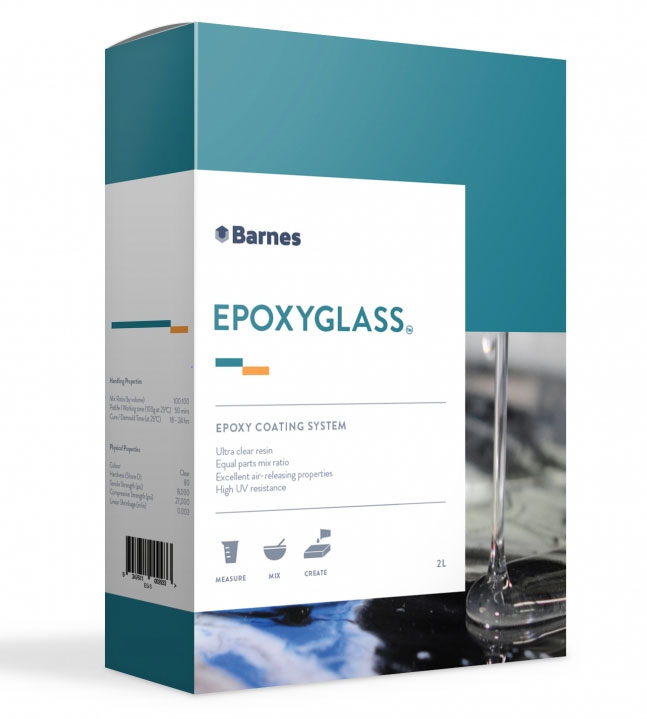
For the bulk of the water I used epoxy from Barnes tinted with a little alcohol based ink (brown). Acrylic paint works as well for tinting apparently, but I didn’t do that.
I also used Soudal sealant (branded ‘Gorilla’ in NZ). More on this later, but it gets an intro here as it was used to create discrete ponds to hold the epoxy. A little dam of sealant formed between rocks retains the epoxy where there is a step change in elevation and a cascade needs to be formed. The dam can be removed or disguised later, but it does pay to keep it as discrete as possible.
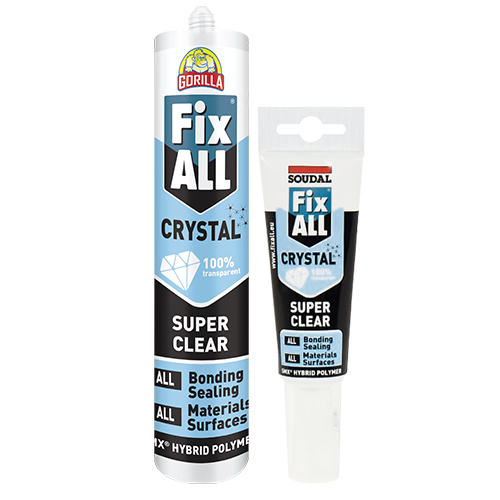 A digression on the sealant…
- It is a polymer sealant NOT an RTV rubber
- It is a neutral cure and quite quick – which is handy
- It is very clear, and combines seamlessly with the other materials
- It is paintable, so compatible with any subsequent treatment we might apply
- It can be thinned with isopropanol to any consistency from super stiff (from the tube) to watery. More on this below.
- It is relatively easy to remove if one is inclined to rework
- Easy to get from hardware stores.
As with all good ideas, it isn’t original. I pinched it from the Internet.
So, back on the layout, I formed a series of pools along the stream bed with the sealant and poured in epoxy to form the water. I started at the high point and worked down in a series of pours working in batches of around 60ml. This epoxy sets slowly without bubbles, but it is good at finding holes and cracks. Once or twice I found my pour ended up in a lower pool than expected, but the initial pour sealed the pool and subsequent pours stayed put. I did place a plastic sheet under the layout just in case and I was happy to build up in layers if desired or needed. It is well cured after 24 hours.
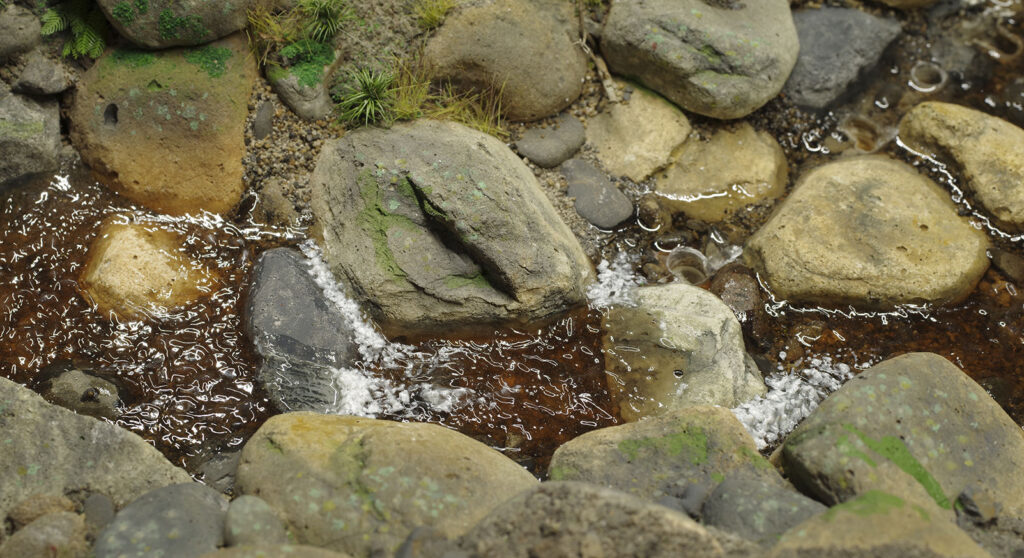
A short length of creek with the epoxy step complete. At the top of the image can be seen one of the sealant dams allowing a level change. There’s another obscured by the large rock in the foreground. At the centre there is a bit of dry-brushed white water – a technique I tried here, but did not persevere with.
Water finds it’s own level. However in rushing streams the velocity of the water over the rocky bed will create quite large standing waves and features that are anything but flat, plus there are all those little cascades to represent. In the model, the epoxy had created the volume that I needed, but the stream still needed these 3D features. At this point I was interested in the larger flowing features rather than the many small ripples and waves. This is where the sealant comes into it’s own. I let down a goodly dollop of sealant with isopropanol until it was quite fluid, but stiff enough to retain some shape when formed with a cocktail stick. This is very easy to achieve. I typically start a bit on the runny side, but after 5 minutes or so it starts to stiffen up. If it gets too stiff, then a bit more isopropanol loosens it up again. A few test runs on a suitable piece of scrap quickly fine tuned the consistency needed and supplied confidence. The various large waves and cascades were formed from this material prodded into place with a cocktail stick. Generally it will be a little too fluid and tend to collapse, but if it is worked with the stick as it goes off, the desired result can be achieved. It is a very forgiving technique. The exact consistency is not that critical and the working time is slow enough to allow relaxed work without being so long as to be arduous. 15-20 minutes should be about right and since I work on a number of areas at the same time this works well. You can keep adding more material in subsequent sessions or tear it out if it doesn’t please.
In this pic there are three ‘pools’ of epoxy, with cascades and white water added with thinned sealant. The latter was worked with a cocktail stick until sufficiently dry to hold the desired form. The sealant is very clear and blends into the epoxy effectively. It never seems to form hard peaks either – which is very appropriate to water in this context. There is no added colour highlighting yet – The ‘white’ water is just reflected light. Compare the previous view. Note also how the sealant dam at the top of the image, that looked a bit naff in the earlier view, is now starting to be blended into the white water. It’s already starting to look like a mountain stream.
At this point the water in the creek is more or less in place in terms of volume. What remains is cosmetic treatment to make it look as realistic as possible. That involves creating an appropriately rippled surface together with some spume.
Materials for this are acrylic gloss medium (I used ModPodge), acrylic heavy gloss gel (Basically similar to the medium, but MUCH higher build. I used Atelier) and Vallejo ground texture-snow (A high build white medium with a granular filler, possibly glass microspheres. Not Vallejo Diorama Effect ‘snow’ which is thinner and lacks the texture material). All of these products are acrylic media with modifiers to produce effects. There are quite a few brands that offer similar products. Importantly, they are all compatible and can be mixed together to produce the desired properties.
There are plenty of YouTube videos around showing how to create small ripples with acrylic media. Basically just brush it on and form ripples with an air stream (dry airbrush/straw) and or a brush. This is, essentially, what I did next but I adjusted the viscosity of the medium by mixing ModPodge with the heavy gel, based on the results of some test pieces. I found I could get more detailed ripples with thicker medium and I chose to use the airbrush to create texture using short distances at very low pressure. The creek is rather narrow so I needed some finesse. A large expanse of water might well suit thinner medium and/or higher air flow. On reflection I think a brush would have been a bit better for the Seven Mile. The air stream is great for creating nice random wavelets, but the brush would probably have enabled me to create the more structured patterns arising from flow. Either way it is pretty subtle, and from most angles you cannot discern the ripples, only that the water is not dead flat.

Thickened ModPodge after application. It does tend to flatten as it starts to dry so I tend to work it with the air stream once or twice in the first hour after application. Caution is needed as once it begins to skin you can dislodge semi-solid chunks which do not look great. Drying time depends on temperature and how much you use, but 24 hours should do it.
The Vallejo snow is very opaque, sharp and white as it comes. Let down with some ModPodge and/or water, it becomes more translucent, smoother and a lot more foam-like. Slightly thinned is good for white water, more dilute and the effect is more restrained as is typical a little downstream from rapids. On test pieces I applied this ‘foam’ mix while the ripples were still wet with good success. This did not work as well on the layout as it was hard to control. A better solution was to wait until the ripple stage had fully dried and then moisten the surface with water (damp but without puddles). ‘Foam’ mix applied to the wet surface blended in nicely with soft edges. When I wanted things a bit crisper I just applied the foam to a dry surface.
In this shot I’ve tried to arrange the lighting to maximise the reflections to illustrate the ModPodge ripples. From most angles the ripples are far less obtrusive. The holes top right are to locate bridge piles. Foam highlights have been added in on top of the sealant white water.
I applied the foam sparingly in many coats, slowly building up to the effect I wanted as experience showed it was easy to go too far and difficult to fix if one did. I applied the foam mainly as small dots, but also in a flicking motion in the direction of flow to highlight high spots. It is possible to deemphasise rough areas by not adding foam or to create new rough areas from foam alone. In this way the effect can be tweaked and tuned to taste at this final step. The key is to be conservative and to allow drying and assessment between applications as the appearance does change a little as the product dries.
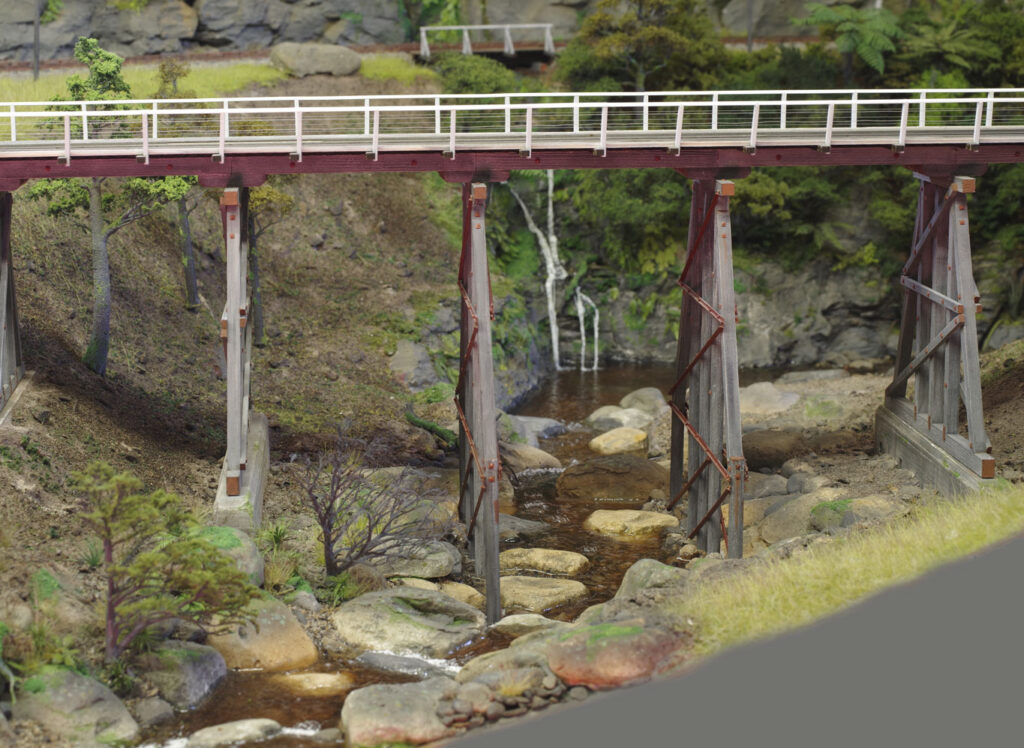
This is the Seven mile creek from the normal viewing position. It’s on a gentler slope and thus quieter flow than the real thing at the head of the post, but I’m happy with that as this is an area compromised by severe scale compression. In any case in this scene the creek is not intended to be overpoweringly dramatic. The next module will have Davy Creek flowing from back to front which will be a bit more impressive as it will be steeper and flowing towards the viewer.
That’s the creek pretty much done for this module. The epoxy has worked it’s way into some spots that are not very realistic and these will be tidied up. Once the bridge is finally placed the base of the piles will need some remedial work too. On the left bank will be some dense, but scrubby bush that will overhang the banks a bit (a few test pieces feature in the above photo). On the right, behind the bridge, will be similar bush merging quickly into more mature trees. On the sandspit reaching into the elbow will be some toe toe and young trees as this is an area that would get wiped clear in high flood. The effect of all this will be to obscure the creek quite a bit. The aim is to make the creek visible, but only a bit at a time, so the viewer will need to move to see it all. Managing the view in this way makes the scene more interesting to look at.
Afterword
For the most part write ups generally imply that things went smoothly, but real life is seldom like that. I reached a point on my initial attempt where I realised that a) I’d really overdone the white water and b) as mentioned above, working the foam into wet ripples really had not turned out very well. The techniques were basically fine – my implementation of them was just a bit heavy handed. I really liked the results, but they represented a far more turbulent stream than I wanted here. The good news is that, by using a piece of scrap styrene as a scraper, I was able to remove the ModPodge/’foam’ back to the epoxy cleanly and easily. The sealant was a bit more difficult to remove. It came away easily from the flat epoxy, but was a little more persistent around details. Nevertheless it wasn’t all that difficult to cut back/clean out for a retry. Complete removal is not needed in any case, as the rework will blend in any residue. I feel this is a real strength of the method. Nothing promotes confidence like the knowledge that, should it all turn to custard, there is a relatively painless means of remediation.