
In which your correspondant ponders the merits of the journey over the destination and the benefits of technology in speeding things up…
In NZR modelling ‘the layout’ is an almost mythical concept. Widely aspired to, often started, but seldom developed to a stage even approaching completion. It’s not hard to understand why. With a prototpe where most everything needs to be kit or scratchbuilt things take a lot of time even if you are willing to accept considerable compromise. It is often said that the journey is more important than the destination, a philosophy I can easily accept. However the destination is still important as without it the journey is a blind bumble. I’m past aspirations and starting, but still very well short of completion, and I would like to change that.
Age brings the understanding that our personal time is limited. Things a younger me might have embraced are now ruled out on the basis that they would take too much time to achieve. Development of the MkIII Fell track illustrates this journey.
My gestating Rewanui layout features the top of the incline with less than 2m of Fell centre rail required, but it is almost all on a curve. It is a relatively detailed structure and needs to be relatively robust. Features are:
- Running rails in bedplates with additional heavy brackets every other sleeper.
- 36′ track sets with wider sleepers at the joints
- A centre baulk supporting the centre rail let into the sleepers.
- Tripod stools supporting the centre rail
- A symmetrical bullhead centre rail.

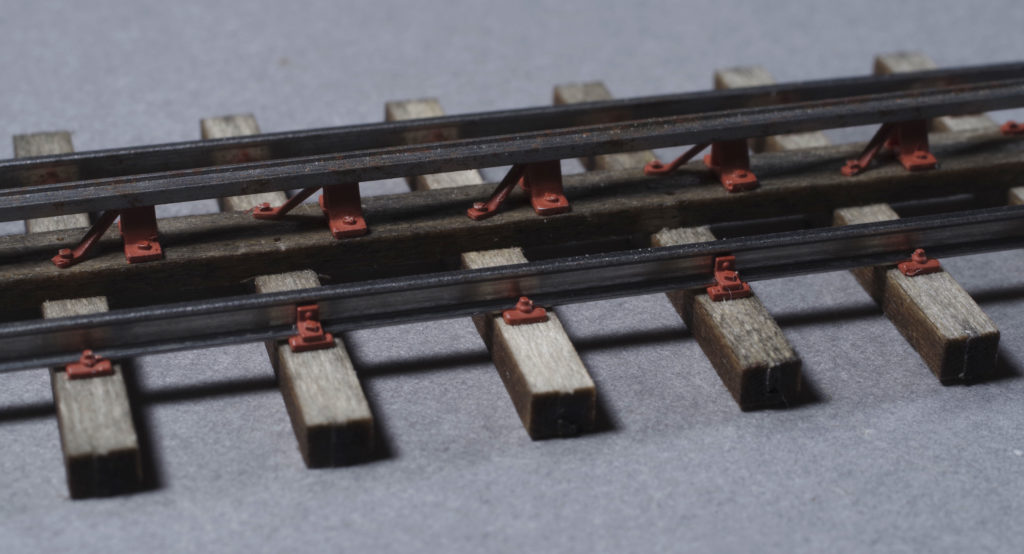
One of my fell vans almost ready for the paint shop sits on the sole length of MkI fell track.
In the days before 3D printers I developed an etch for fold up stools, with bedplates. Together with Grandt line NBW mouldings these could be assembled into what I considered excellent Fell track. I built the short length illustrated many years ago and felt I’d ticked the ‘Track’ box on my extensive layout ‘to do’ list. It’s strong, and looks pretty good. It is NOT quick or easy. The centre rail is drilled, which while jigged is still quite an effort.
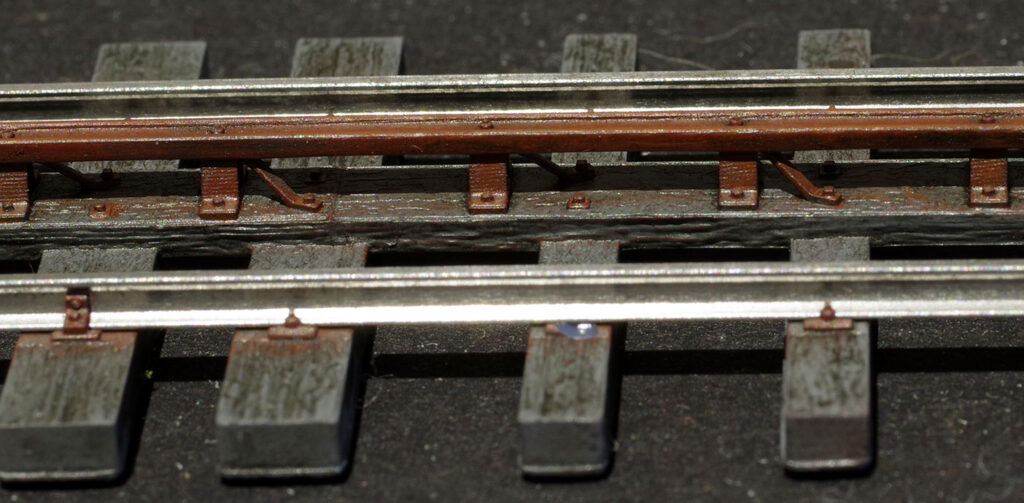
MkII track. More accurate and viable.
The first layout module I’m working on features the incline and so I was forced to confront the impending reality of building the track. In the meanwhile laser cutting and 3D printing had come along. The building of MkII track (and prototype information) is described in detail at https://nzfinescale.com/finescale-3-rail/. Pretty good. Certainly buildable (though still a fiddle), better looking and in all ways adequate. The centre baulks are a bit weak, and attaching/detailing the centre rail remains a bit problematic, but all achievable.
I was pretty happy with MkII and was well along with it, having produced all the 3d printed parts and obtained the laser cut bits required. Again I’d ticked a box and moved on as track laying wasn’t imminent. I wasn’t looking forward to it either as the trackbed is hard to get to and it was still going to be a fiddle. In the meanwhile things moved on. The larger format printer arrived. I tried printed centre rail for Peter Ross (Roa) as he needed something different to what I had in mind. I experimented with textured surfaces on structures and wagons and noted that others on the web had tried printed track.
So given that almost all of the drawing work done on MkII could be reused to quickly draft up a completly printed MkIII, I thought I’d see what could be done.
The MkIII test piece. The rail fixings were a bit tight and one here has broken away as a result, but things look pretty good. Just paint and slip in the running rails – and I only need 7-8 lengths in total.
The test piece was quick but the final draughting took a bit of time. The track sets are drawn from the CAD track plan so the curve is already formed. The result looks good and is quick and easy to produce and use. The MkII might be a bit crisper and is certainly easier to paint. The MkIII centre rail doesn’t need fitting and will be perfect, which is a big plus. There’s a small bridge in the middle of this section so that needed something customised – the third version of the bridge so far, although most of the second version was reused. It occurs to me that a MkIV with the wooden sleepers but printed baulk/centre rail assembly would work quite well if one were wedded to using wooden sleepers. I don’t plan on doing this as the MkIII suits my needs best I think. The incline is towards the back of the layout and any percieved visual advantage to real wood would not be apparent.
So my Fell rail journey enters the final straight. The time has come to lay the track, so fairly soon I need to put it all together.
Reading my recent jottings it may seem that I have stopped modelling and become a computer geek and 3d printer. There is an element of truth in that. I find the ability to copy and mirror on the computer to be very attractive but the ‘undo’ function is the BEST! The modelling pleasure is pretty similar, but without a lot of the frustration. In terms of building an NZR layout all this 3D printing is accelerating progress immensely. It is not so much that I have stopped modelling, but that I’ve circumvented many of the dull, repetitive and unrewarding bits. My real world modelling is a lot more productive and enjoyable and completion of the layout is now at least conceivable.