
A few blog posts, and some time, ago I expounded on some fairly general tree making thoughts focussing on the armature. At the time tree making was not my focus and the blog described some experiments and test pieces. Hopefully useful in a general way. This time around I have spent many hours working on techniques to recreate the flora of the West Coast bush. This is far from finished, but the techniques for trees and other plants are sufficiently bedded in to share, and there are enough modelled examples to provide some visual interest to the post. If I get my act together, this is the first of a mini-series on the subject.
![]()
This is the layout from above the tunnel. A view nearing completion, but one not normally seen (which is why the usually obscured watercourse above the track looks a bit rough here). It illustrates the larger scope of what I’m trying to achieve, of which woody trees and shrubs form only a part. There’s a wide range of model plant types contributing to the scene here, but realistic form and colour of the trunks, branches and leaves of the trees are important elements.
To recap, the tree making process is typically as follows:
- Research. Trees probably do not look exactly like we think they do (I’m as guilty as the next man of making things up). If the goal is realism, then the study of the real thing will help a lot. Different tree species have different habits, foliage and colours. These are all things we can vary, so it is worth trying to model specific species. I don’t do this slavishly, but I do try to match the broad form, foliage and colour of my model trees to real examples.
- Armature – the trunk and main branches. There are many ways to do this. Gordon Gravatt uses wound wire which until recently was the most realistic, but hardly fastest method. I like to 3D print them, and there are a range of other manufactured and natural materials one might use as described in my earlier post.
- Bark – texturing and colouring the armature including the addition of mosses and lichens.
- Twigs – Something to support the leaves
- Foliage
- Finishing
I like tree modelling and I’m prepared to invest time into it. However, as I’m modelling a forest, I’m after methods that can be applied relatively quickly. It’s impractical to spend a lot of time on each and every tree and I need methods and approaches that can be applied en masse, fairly quickly.
My research comprises a heap of photos derived from a number of trips to Rewanui, supplemented by Internet sources as one does. I will have one or two wire-wound and natural (mainly root) armatures, but my current preferred method is for 3D printed woody parts. Don’t worry if you cannot access printing, as most of this post applies to armatures made in any fashion. But whatever method might be chosen for armature manufacture, this post assumes that this task is accomplished and focusses on what comes next.
Trees that I should really have:
- Red and silver beech (mature and saplings)
- Rimu (still somewhat problematic for me at this point)
- A wide range of smaller shrubs and/trees. West Coast temperate rain forest is rather diverse.
Initial thoughts
Model making, theatre and movies all work best if the viewer can readily ‘suspend their disbelief’. Obviously, like any other modeller, I do my best to make my models look like the real thing to the best of my ability, and the better the job that I do the less the viewer’s subconscious (or conscious) will try to pick it apart. But even modest tree modelling efforts can work quite well provided that it is not obvious how the tree was made. Bearing in mind that many of those observing the model will be hobbyist peers, this can be quite difficult. However, the mind is generally receptive to deception, so it’s just a question of avoiding glaring giveaways where possible. It is certainly worth mixing materials and ensuring that trunks and branches are filled and smoothed to disguise how they were put together.
Solid blocks of single colours are uncommon in nature and unconvincing in models. Anything that achieves variation around the average shade is likely to improve realism. Likewise, trees viewed from distance will appear to differ in ‘texture’ as the size, distribution and other properties of the leaves will alter the appearance of the tree ‘surface’. Using different materials in the model to represent the leaves will help to recreate this effect.
One thing I’ve found is that good armatures generally make good trees. A realistic branch structure supports the twigs and leaves in a way that looks right, something that is hard to achieve without that structure. On the other hand, in many cases the actual branches and trunk are barely visible in the finished tree, so are they worth modelling? I think they probably are as they peek through quite often, even if only subtly, and that is key to a realistic look. I’ve taken the approach of modelling all tree armatures in detail – in large part as this is easy with printed armatures, but it is also a philosophy I use for most modelling. It reduces the ‘art’ I need to use and I can just stick with the practicality of planting realistic trees. Those with more talent may be able to achieve a realistic appearance with less effort.
I generally fit a spigot to trunks to make handling and installation easier. Generally this will be a 1mm wire, but different armatures might suggest other approaches. Wire is handy as you can easily grip it in a pin chuck, or similar holder, to facilitate work on the tree and stab it into some rigid foam for temporary tree storage. A little tip I stumbled upon to mount trees: My geology is a mix of urethane foam, closed cell styrene (blue), newspaper/wallpaper paste, plaster and Sculptamold. Drilling holes is quite unpredictable and can generate unwelcome piles of dust in a range of inconvenient tones. I’ve found the best way to make holes is to poke them with a round needle file. The holes are easily adjusted for diameter and there is very little collateral damage as all the mess is carried into the hole. For small holes (to take a 1mm wire) I use a smooth broach as it is long, resilient and comes with a handle. The idea is the same though, push the hole rather than cutting it.
Thoughts on bark
How much effort one applies here will depend on inclination, time and how large and prominent the finished tree will be. Small trees generally have relatively smooth bark, so not much is needed. larger, older trees usually have a much more interesting surface that will be worth capturing if it will be visible.
The first thing to do is disguise how the armature was made, and this typically means some sort of high build material to cover/fill the trunk. In my case the 3D printed trunks are quite smooth so they really benefit from a quick coat of a textured medium like Vallejo’s red oxide paste. A large foreground tree might need more work, but I find the red oxide paste provides sufficient texture to give the impression of ‘not smooth’. Brushing in a vertical direction aligns the roughness to form ridges that are quite typical of the bark of many trees. That’s generally adequate in 1:64 unless your tree has unusually rough, smooth or characteristic bark.
Next I paint the trunk with a spray can of flat grey primer aiming to get the base colour of the upper branches.
For larger trees, I then airbrush on the main trunk colour, blending this into the base colour at an appropriate height up the tree. I don’t generally fuss much about it, but that will depend on how visible the trunk will be once the tree is installed. Most of mine are hard to see, but real beeches have visibly very pale upper branches that are worth replicating. An alternative for smaller/quicker trees is to use a dark grey spray can with poor technique to spatter dark grey over the armature. This gives a good, fast variegated effect that is quite realistic, particularly on smaller trees and shrubs. For a foreground tree dark washes and light dry-brushing of highlights can be very worthwhile. Few of mine get that refinement.

A small tree (that hopefully looks like a lemonwood) in progress. 3D printed armature sprayed with the 2 tone grey spatter technique. I’ve also added sliver twigs to the lower branches which not unusually, do not look very effective at this point. This is a slope tree so deliberately somewhat asymmetric in shape and lacking much foliage beneath the canopy.
Many trees, particularly on the West Coast have growths of lichen and other things on the bark in a range of hues, some of which can be quite brightly coloured. These are quite obvious as they break up the uniformity of the bark colour. I initially used a military modelling technique for mud splatters to achieve this. This involved loading a flattie brush with the desired lichen colour and blowing air through the brush (with an empty air brush) so that dots of paint are blown onto the model. It takes a bit of trial and error to get right, but once you have the hang of it it is simple to get the branches and trunk festooned with appropriate growths. Alternatively I’ve found stippling with a stiff brush also works pretty well and is far easier to achieve, with less mess. I choose the technique that suits my time budget and quality aspirations for the tree to hand.
Add moss and small plant growth if appropriate by applying matt medium with a brush, followed by green turf/foliage in appropriate colours and grades. I like to use an extremely fine grade of ground foam in bright shades for this. Coarser foam can represent creepers etc.
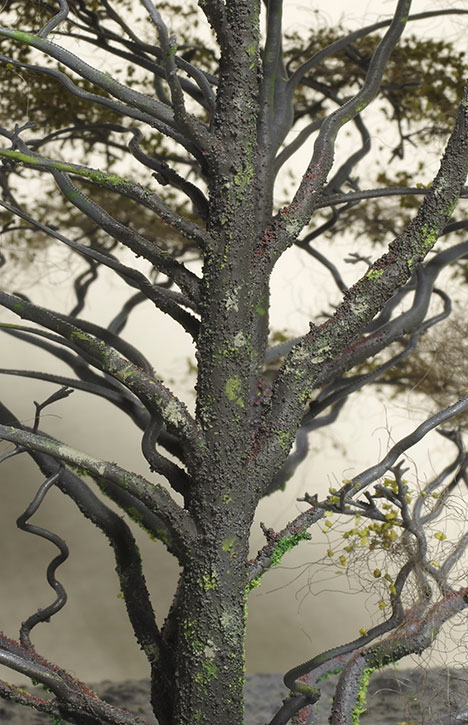
This is the back of one of the trees featured in the header photo, normally to a rockface and thus with few branches on this side. This is the Javis fine turf foliage. The bark texture is Vallejo’s red oxide paste, and the smaller branches just the 3D print surface untextured. This trunk has had the stipple treatment above and the resulting ‘lichen’ patches are obvious. Lower down the trunk there is a bit of moss, though not a lot visible in this shot. This approach is pretty quick to do and very effective at a little distance. If your trees are going to be subjected to macro photography then a bit more care might pay dividends.
This general method, particularly if applied to a batch of trees, creates a very effective appearance quite quickly and does not require any great skill.
Thoughts on twigs
The trick with twigs is replicating the function rather than necessarily the realistic form. In other words providing a good support for leaves, without being unrealistically obtrusive, but maybe not being all that twig-like.
I like to use sliver (wool supplied in a rope without twist, also known as roving, from a suggestion by Grant Morrell). It’s cheap from craft shops and comes ready coloured. I use a dark brown, but grey or black would probably work as well. It will not look much like a real twig, but it ends up almost invisible and supports leaves well. Wool fibres have microscopic scales which tend to usefully lock adjacent fibres together. Better than synthetic polyfibre/dacron sometimes sold for this purpose. Gordon Gravatt recommends postiche, which I understand is a synthetic hair for wigs. I haven’t tried it but it looks similar to sliver.
I cut 8-10mm off the end of the roving to work with. This is somewhat critical. Too short and the fibres tend to separate and are hard to work with. Too long and they are hard to manage. I pull out a few fibres and tease these into a very open flat web around 10mm across. This is arranged around the branchlets without adhesive. My armatures have a lot of small branches, so this is easy. Poking the wool between the larger printed twigs locates and retains it in a way that works well for the end result. Fewer branches (on wire wound armatures for example) may need more sliver applied with more care if the armature is providing less structure. Once all the sliver is fitted I give the tree a squirt with hairspray (Cheap stuff from the supermarket with as much hold as you can find, preferably unscented) to fix the sliver and provide an adhesive for the foliage. This is one of the few modelling tasks where there is a ready ‘Undo’ solution. If you don’t like it, it is easy to pull off all of the twigs/foliage and to start again.
Thoughts on foliage
I struggled for ages with leaves. Woodland Scenics didn’t look right to me and few of the many other brands I have do either. I’ve since used Javis materials (possibly a ground cork) from the UK which I quite like. As I approached the sharp end of tree building, something needed to be done and as usual the first thing was some hard thought.
The first observation was that our trees are typically a lot smaller that scale for practical reasons. As a result leaves should be somewhat proportional to the tree rather than scale. This is perhaps not an absolute rule, but for the most part smaller than scale leaves are likely to work better on smaller than scale trees.
The next contemplation was around leaf shape. With small leaves it probably does not matter much, but many leaves are quite large and even modelling them underscale their general shape should be apparent. With a bit of experimenting I ended up settling on:
Very small leaves – any of various ‘turfs’ or ground foam from Woodland Scenics, Noch and others. The Javis material is excellent for this, though it doesn’t look much like a leaf close up. From even a short distance it looks very well as it is uniformly sized, free flowing and easy to apply. The Javis material is somewhat larger than ground foam turf and has a different texture. As such it is great for adding variation to the canopy.
Small ovate leaves – Noch. The Noch leaf material (Their ‘leaf’ rather than ‘foliage’) does have a generally flat ovate shape, but failed to really satisfy me until I realised that, as supplied, the size range is too large to be convincing as the leaf size on a tree is relatively uniform. So I sieved it to yield about 90% fine leaves and 10% somewhat larger. As obvious and simple as this sounds the difference is huge.

A small tree with the fine fraction of Noch’s ‘leaves’.
Large ovate leaves – the Noch oversize left over from the sieving above.
Long narrow leaves – Heki (wood based, and there are other similar materials in other brands). My main problem with these is in the application. Sprinkled on they are expectedly random, while the real thing is typically aligned outwards from the tree (or at any rate non-randomly). Applying these leaves with a static grass machine did improve matters, but this is a bit of a work in progress. As with the Noch product, this one has a lot of undersize material that can be usefully screened out.
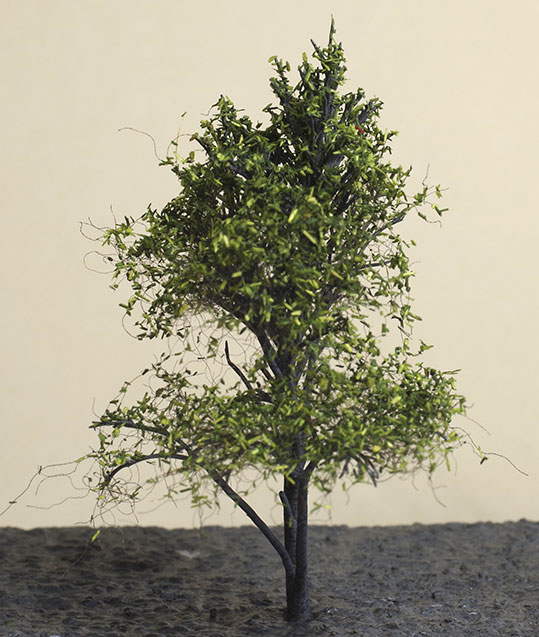
The ‘lemonwood’ shown earlier, now with an application of Heki foliage. This is NOT a foreground, specimen tree. The intention with this one is to place it amongst other trees, so I was after something quick and ‘lemonwoodish’ that will look right and realistic in context, not win any prizes when posed in isolation.
Most of the above materials are coloured in unsatisfactory shades, and were either far too uniform or far too variable. The answer to this is described below.
I’ve used hairspray to attach the foliage. You can have 2-3 passes at it, so it pays to go easy initially. I’m careful to spray mainly from the top to avoid making the branches and trunk sticky as leaves directly fixed on large branches do not look right. If that does happen they can be brushed off fairly easily with a stiff brush, but it is easier to avoid the issue if possible. I sprinkle on the foliage from 100-150mm height to avoid clumps.
After applying the foliage I give the tree a bit of a shake to remove loose bits and a haircut to remove any few flyaway strands of sliver if needed.
Thoughts on finishing.
At this point I typically feel the tree has at least two significant problems. It may have more, but let’s focus on the two that are almost universal.
Firstly, the foliage colour will typically be unsatisfactory in shade. Even if it’s quite good it may not be ideal for it to be exactly the same as every similar tree on the layout. Secondly, it typically looks a bit flat as ALL the foliage is the same colour. Even if you used foliage material with variation, once applied to the tree that variation is uniformly spread over the whole tree. In life, colour variation tends to occur with age of leaf, top/bottom surface, light exposure and so on. It is not random. Subtle colour variation looks natural between leaves and between trees, but it needs to look believable.
The answer is to recolour the foliage. This is easy to do and makes a huge difference to the realism of the tree. I find the best approach is to use foliage material that is lighter than the desired shade and to darken it using an airbrush (but could probably use a can with caution). Many trees have leaves that are paler on the under side, and by applying a dark colour from above an impression of this can be generated. My go to is to use coloured ink in the airbrush, but thinned paint works just as well. Ink tends to be transparent which I think helps (but may not be as fast long term). The idea is to modify the original colour with variations, not completely repaint. If sprayed from the top the over colouring will tend to naturally layer and shade in quite a pleasing way. Of course, while it suits my narrative to discuss recolouring at this point, the forward thinking modeller will have planned ahead and matched material starting colour and recolouring options in advance. But if not, recolouring with inks is quite flexible and can improve most foliage. A further light application of hairspray and the base foliage can simulate fresh growth nicely.
If uniform coloured foliage was used then variation is introduced. If multicoloured ‘leaves’, like the Heki wood shards, were used then over colouring tends to beneficially reduce the contrast without completely removing the variations.
A slightly different approach (suggested to me by Barry Fitzgerald) is to use a spritz of bright green (spray can or airbrushed ink) to add highlights and represent growing tips. Very bright green works well but you need to be sparing with it. The idea is to modify and brighten the base colour without introducing solid areas of bright green.
For a forest scene one can do either or both to add variation to the foliage colour. If doing both one might start with light flock, over spray generally with darker/olive green ink mainly from the top, but also at an angle to coat most of the foliage. A bright green finish would then be light and only from the top. This sort of approach adds significant life to the tree model.
I often finish with a squirt from a can of matt lacquer to remove any gloss from the hairspray and to help fix everything in place. A bit of gloss to foliage is not necessarily a bad thing, but trunks and branches should be quite flat.
By recolouring it is possible to far better represent appropriate foliage colours compared to relying on commercial flock palettes. In addition each tree will inevitably be just a little different in colour. Even though this may be almost indiscernible, the brain does pick it up and the overall impression is improved.
Building the gorge scene at Rewanui
The gorge scene is a work in progress. There’s a lot of learning and trial/error at present as I sort out what works and what does not. While I never stop learning, the lion’s share of this phase is nearly over as the various methods get bedded down, and I’m seriously hoping for faster progress henceforth. In any case I’m committed as the trees get fixed into place. For better or worse, the scene above track level is pretty much all glued down. Below track level things are a bit fluid yet, and most of the trees are yet to be fixed in place. Still, I find it useful to place a few to get a feel for how the scene will look from available viewing angles. I want to manage the views a bit, to make sure things are visible, but not necessarily at a single glance. I’ll often place a few trees and leave them a day or two to decide whether they ‘work’ for what I’m trying to achieve. I generally take photos and check these on screen as any issues are much easier to spot this way.
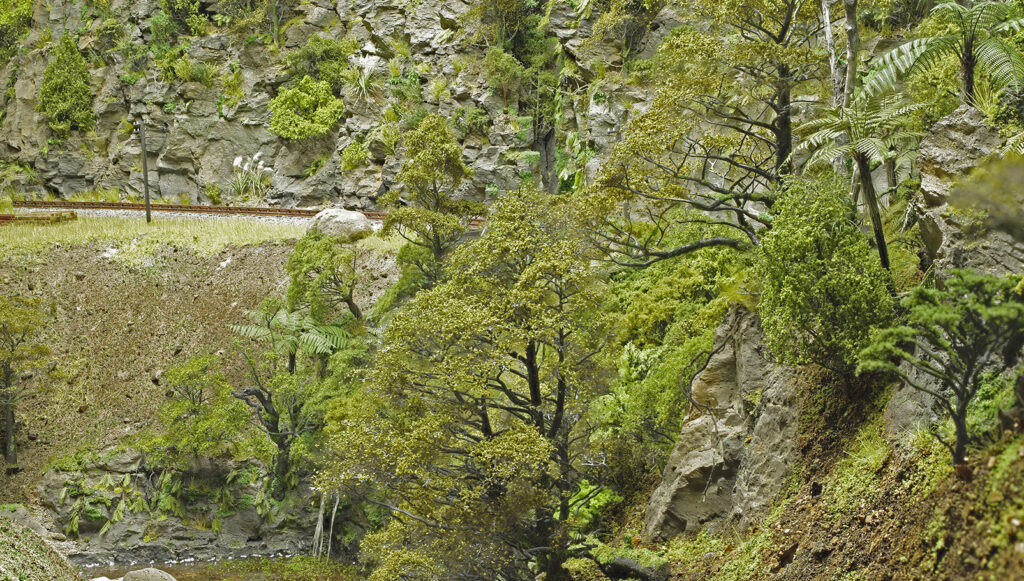
A view up the gorge. It’s not just trees of course. Deadfall, moss, roots, ferns, rock, non-woody plants etc all contribute to the overall scene.
Interestingly, I’ve found it pretty easy to produce nice trees in bulk, BUT as the skill level increases so does the temptation to produce trees that better suit the location. So above the tunnel we have bush that has been cut over 40-50 years previously with a telephone line carved through it. Below the track is 30 year shrubbery that has grown since the formation was built. At least I hope it looks like that. Trees and shrubs that represent the close packed and steep location are a bit trickier to do, but worth the effort.
I’m working forwards, so the backshunt bridge is yet to be installed, and the creek won’t be finally ‘watered’ until the far bank is complete.
As I’ve gained practice modelling and printing tree armatures, the scope and possibilities have expanded. Initially I was wildly excited to produce a ‘tree’. Any stick with branches was pretty exciting and it is not very hard to produce something at least on a par with most of the alternatives. As I’ve gone on I’ve found:
- Software matters. Some freeware is surprisingly capable, but you do get what you pay for in flexibility and ease of use.
- Large trees are exciting, but shrubs are far more useful, on the whole, and having a way to make a LOT of nice shrubs quickly is very useful. Compared to lichen or scouring pads, printed 3D printed shrubs are in an entirely higher league.
- I’m dealing with steep landforms and asymmetrical trees are typical. Generating these is worthwhile, but a step up from the ‘stick with branches’.
- I have compressed the geography for the gorge scene, and by trial and error decided that using smaller than scale trees works best. I can produce very large trees, but smaller trees in profusion create the atmosphere I’m after more successfully. I made a few large trees at 220mm (scale 14m, still well short of around 30m for beech), but I’ve settled on a maximum of around 130mm (8-9m). I’m not modelling mature forest so this is not quite the compromise that it sounds. At the other end of the layout there is less compression and trees in the foreground, so these may well work at a larger size.
- Lighting really impacts what the scene looks like. I’m using neutral white LEDs to light the layout with a pair of light bars running the length. Choosing colours under this light and getting the lighting angle right significantly affects how the scene appears and makes it pop.
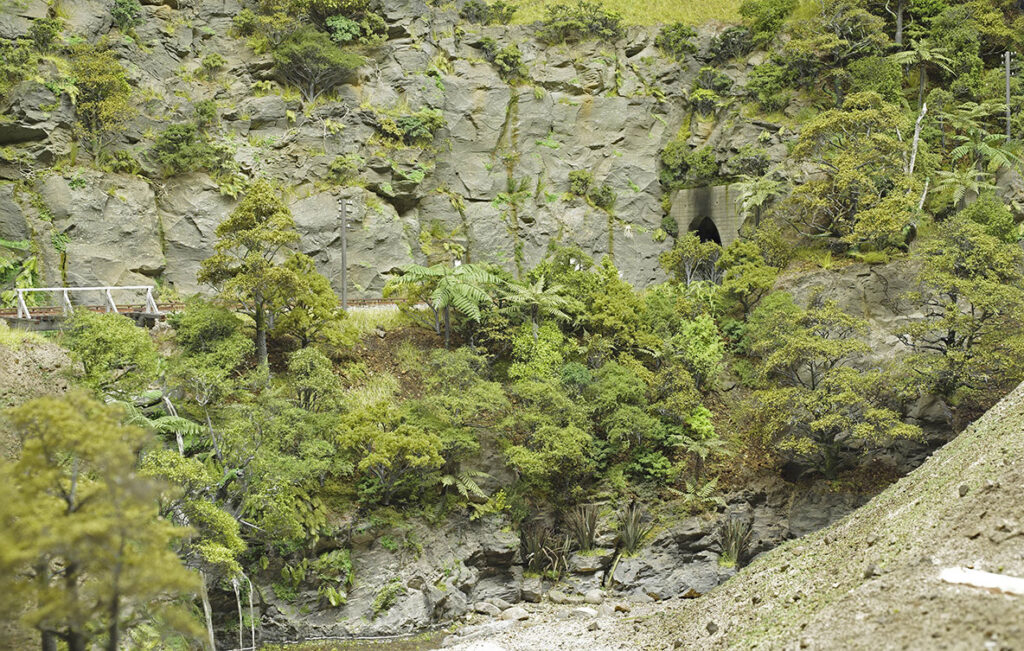
Finally, this is the gorge from the normal viewing angle. The near bank still needs to be done and the backshunt bridge will span this view.